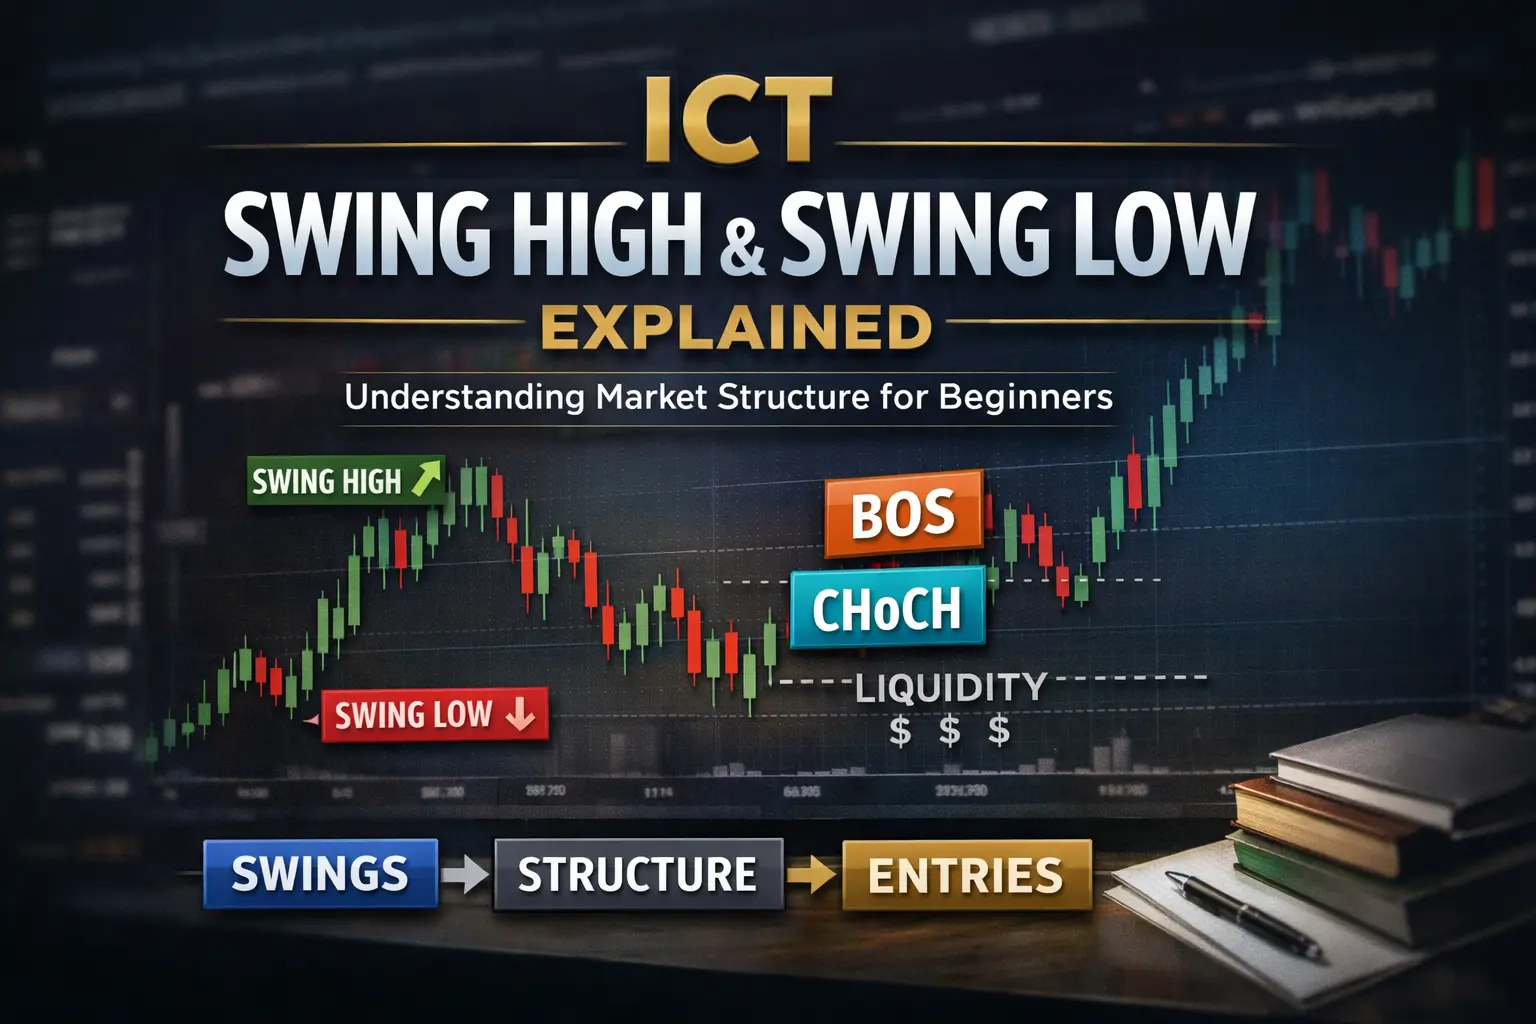
Fair Value Gaps (FVG) in ICT Trading: Complete Guide to 3-Candle Imbalance, Entries & Market Structure
- Published On: 07/12/2025

Join Our Telegram Channel

If you’ve ever marked dozens of “gaps” on charts and found most of them irrelevant, you’re not alone. Traders confuse every quick move for a tradable imbalance and end up with noisy entries and poor conviction. In Smart Money Concepts (SMC) and ICT logic, a Fair Value Gap (FVG) is not a cosmetic label — it’s the footprint left when price moves so decisively that the market fails to rebalance immediately.
An FVG is the visible evidence of institutional urgency. When displacement cuts through price, it often leaves an area where opposing orders were never filled. That empty zone is more than an artifact: it’s where smart money may return to mitigate, re-enter, or finish accumulation/distribution. Recognizing which FVGs matter is what separates wishful trading from a repeatable edge.
Not every imbalance is tradable. Many so-called “gaps” are product of news, spread widening, or micro-chop. The FVGs that matter share a consistent anatomy: they form after intentional, fast moves, align with the liquidity story, and sit within a clear structural narrative. When these conditions exist, an FVG becomes a high-value map for where price will likely revisit.
This article will teach you how to tell the difference. You’ll learn the logic behind why FVGs form, the exact 3-candle signature to watch for, how FVGs interact with displacement, CHoCH, BOS, and Order Blocks, and — most importantly — how to use them for precise, institutional-aligned entries.
By the end of Part 1 (this section) you should have a clear mental model of:
Ready? Keep reading — next we’ll define the FVG precisely and show the exact 3-candle structure you must train your eyes to spot.
A Fair Value Gap (FVG) is a three-candle imbalance that forms when price moves so quickly in one direction that the opposite side cannot respond. In plain terms, the market becomes momentarily one-sided — buyers overwhelm sellers, or sellers overwhelm buyers — leaving an area where no fair exchange occurred. That void between Candle 1 and Candle 3 is the FVG.
Think of an FVG as a void: a zone price didn’t spend enough time in, didn’t trade fairly across, and will often return to later to rebalance.
The classic FVG forms when:
That visible space is the inefficiency — the market moved too fast for both sides to trade at fair prices.
Many traders label every small empty space an FVG. ICT’s version is stricter: it requires real displacement and narrative context. An ICT-grade FVG:
During a strong move, price doesn’t trade evenly — it pushes with force and skips over price levels. That creates inefficiency: buyers and sellers didn’t transact, limit orders were bypassed, and liquidity remains unfilled. Institutions frequently return to those zones, making FVGs important for entries and structure.
Once you adopt this stricter, ICT-style definition, you stop marking weak micro-gaps and begin identifying true institutional footprints — FVGs that form after displacement, sweeps, CHoCH, or BOS confirmations.
A Fair Value Gap does not appear by accident. It forms only when the market becomes unbalanced — when buyers or sellers dominate with such aggression that the opposite side cannot respond. This sudden burst of one-sided order flow is what creates the classic 3-candle imbalance.
At its core, an FVG is a signal of urgency. It shows that institutions had to move price quickly, without giving the market time to trade fairly. This leaves behind a zone where almost no transactions occurred — and that unfinished business becomes a magnet for future price action.
During real displacement, institutions push price using massive order blocks. These orders overwhelm the opposite side of the order book. As a result:
This aggressive shift is exactly what creates the empty space between Candle 1 and Candle 3 — the FVG.
Because the move is so fast, many orders remain unfilled. Buyers cannot match sellers, and sellers cannot match buyers. This leaves a zone where:
This unbalanced area is what ICT calls inefficiency.
Institutional trading requires precision and balance. After displacement, large players often need to:
This is why price commonly revisits the FVG — not because “gaps must be filled,” but because institutions must complete their process.
An imbalance formed without displacement is weak. But when strong displacement produces an FVG, it reveals:
This combination — displacement plus FVG — is why the concept is one of ICT’s most precise and tradable tools.
Not all FVGs are the same. Even though the three-candle imbalance looks identical on the chart, the meaning behind each type can be completely different. Some FVGs signal a healthy continuation of the trend… others signal a reversal… and some warn that the narrative is shifting.
Understanding these differences is what separates a casual “gap drawer” from a real ICT trader.
A bullish FVG forms when buyers overwhelm sellers so strongly that price blasts upward without giving bears a chance to respond. This creates a clean imbalance below the candles — a void that price is likely to revisit later.
Key characteristics:
Bullish FVGs appear when institutions are accumulating or when they intend to deliver price toward the next buy-side liquidity (BSL) target.
A bearish FVG forms the same way but in the opposite direction. Sellers hit the market with force, pushing price downward and leaving a void above.
Typical signs:
These FVGs reveal institutional distribution — the beginning or continuation of a markdown phase.
This is where most traders get confused. Two FVGs can look identical, but one continues the trend while the other marks the birth of a reversal. Context is what gives them meaning.
A continuation FVG appears inside a healthy trend. It reinforces momentum and signals that institutions are still delivering price in the same direction.
Often forms after:
It essentially says: “The trend is healthy — expect continuation.”
A reversal FVG forms after a liquidity event, usually accompanied by a CHoCH. This is the moment institutions flip direction and reject the old trend.
Usually forms when:
It signals: “The narrative just flipped — pay attention.”
Bullish and bearish FVGs may look identical on the chart, but only the surrounding narrative reveals whether:
This is why FVG should never be traded in isolation. It must be read alongside liquidity behavior, structure shifts, and displacement.
One of the biggest problems traders face is marking every FVG they see. But ICT is very clear: not every imbalance matters. Most of them are noise created inside consolidation, low-volume sessions, or weak pushes with no real intent. A tradable FVG is one that forms from institutional aggression, not random volatility. This section shows exactly how to tell the difference.
An FVG is only meaningful if it forms in the right part of the chart. Good locations include:
A beautiful-looking FVG sitting in the middle of nowhere is still low-quality.
Bigger does not always mean better. A huge FVG can be news-driven or part of exhaustion. A small, clean FVG after displacement can be extremely powerful.
Ideal FVGs are:
If the gap looks chaotic or oversized, be careful — it often signals temporary volatility.
FVG without displacement = weak imbalance
FVG formed because of displacement = institutional footprint
Ask yourself: Did a strong move create this gap?
If the answer is no, the FVG is likely meaningless.
This is a major filter. High-probability FVGs usually appear after the market grabs:
Liquidity → Displacement → FVG
This sequence tells you smart money is behind the move.
The best FVGs appear during sessions with real institutional activity:
Low-quality FVGs appear during:
If there is no volume, the imbalance carries no weight.
High Timeframe FVGs are far more powerful because they represent larger order flow.
HTF FVGs set the narrative. LTF FVGs only refine the entries.
If both align → high-probability opportunity.
An FVG is only tradable if structure confirms the direction.
Bullish FVG requires:
Bearish FVG requires:
FVG without structure is like a footprint without direction.
A valid FVG usually has these characteristics:
If an FVG passes this checklist, it is worth trading.
Fair Value Gaps on their own are powerful, but when you combine them with liquidity, the entire picture becomes clearer. Liquidity shows where the market takes orders; FVG shows where the market failed to fill orders. When they appear together, you’re looking at one of the strongest institutional footprints in ICT concepts.
Most of the highest-quality setups you see in ICT charts follow the same rhythm:
the market sweeps liquidity → displaces strongly → leaves behind an FVG.
This combination tells you the move wasn’t reactionary — it was intentional.
A sweep is the market grabbing fuel. Stops get hit, breakout traders enter, limit orders get triggered — and all of that creates liquidity that smart money uses to build positions. Once enough liquidity is collected, price finally gets the “power” to move aggressively. And that aggressive move creates the FVG.
When you see an FVG after the sweep, it means:
This is why FVGs formed after sweeps tend to hold better during retracements.
Structure shifts can sometimes be confusing. A CHoCH may look weak. A BOS may look questionable. Wicks may fake you out. But when a structure break happens with an FVG, the picture becomes obvious.
Here’s why:
In other words, the FVG acts like a stamp of approval — confirming that the break is real.
Think of the market like a vehicle:
Without liquidity, institutions cannot create force. Without displacement, they cannot break structure. Without FVG, you cannot see where they committed positions.
This is why the ideal sequence is always:
Liquidity → Displacement → FVG
It’s a complete story:
When all three appear together, the entry becomes simple: wait for price to return to that FVG, and follow the same direction institutions already committed to.
If liquidity is the fuel and FVG is the footprint, then displacement is the moment the engine roars. Every meaningful FVG begins with displacement, and without it, an imbalance is just another hollow gap on the chart. Displacement is what separates an ICT-grade FVG from a random inefficiency that retail traders constantly misinterpret.
When institutions commit to a move, the candles don’t drift — they drive. These strong drives create the three-candle structure that forms a true FVG, and this pattern becomes the clearest evidence of real order flow.
A Fair Value Gap is essentially a byproduct of imbalance. But imbalance only happens when one side of the market overpowers the other so aggressively that price doesn’t come back to trade in between the candles.
That kind of aggression does not happen during:
It only happens during real displacement, when institutions are executing large orders with urgency.
The rule is simple:
No displacement → No meaningful FVG.
A gap formed without displacement is unreliable because it doesn’t represent real institutional intent — it’s just price skipping around.
A proper displacement-based FVG always shows the same structure:
This creates the imbalance between Candle 1 and Candle 3 — the space where price did not return. That space is the “inefficiency” that institutions will later rebalance.
This three-candle formation tells you three key things:
This is why the cleanest entries appear when price trades back into this gap.
A weak FVG is easy to spot. It usually forms when:
These FVGs are filled almost instantly and rarely produce continuation because they are not born from institutional commitment.
Weak FVGs = weak follow-through.
Strong FVGs = strong follow-through.
The difference is always displacement.
Displacement does more than just create the FVG — it validates it.
Whenever you see a clean imbalance immediately after a strong push, it tells you:
This gives you a precise entry level that aligns with institutional activity. Instead of chasing the breakout candle, you simply wait for price to retrace into the FVG and then confirm continuation.
It transforms your trading from emotional guessing to structured, repeatable logic.
If the FVG wasn’t created by displacement, ignore it.
This one rule alone dramatically improves your chart clarity.
When displacement produces the imbalance, you know:
This is why displacement + FVG is considered the institutional signature in ICT’s model.
Order Blocks and Fair Value Gaps are two of the most powerful concepts in ICT. But many traders try to use them separately — and that’s where confusion starts. In reality, the strongest setups come from combining both.
The Order Block tells you where institutions placed orders.
The FVG tells you where institutions caused imbalance.
When both appear together, you get a complete footprint of institutional activity — from where they entered to how aggressively they pushed price. This combination becomes one of the most precise entry models in smart money trading.
A valid Order Block is not just the last up candle or last down candle before a move. A real OB becomes “valid” only when this sequence occurs:
This confirms that:
This is why a displacement-based OB is far more powerful than an OB marked in isolation.
The magic begins when price retraces. After displacement, price usually returns to:
This creates a powerful stacked confluence zone where:
You never chase the displacement candle — you wait for price to return to the area where institutional orders were actually placed.
Most beginners mark every small consolidation as an Order Block. But the truth is simple:
If an OB doesn’t create displacement → it is NOT a valid OB.
And how do you confirm displacement?
By the presence of an FVG.
This means:
The FVG acts like a verification stamp, proving the move from the OB was driven by real order flow.
One of ICT’s cleanest setups appears when a small Order Block sits inside the Fair Value Gap created by displacement.
This typically occurs:
The logic:
When price taps the OB inside the FVG, you get:
This pattern repeats across assets, sessions, and timeframes.
Using Order Blocks alone can feel uncertain.
Using FVG alone can feel incomplete.
But when the two align, you get the full story:
This makes OB + FVG one of the highest-confidence models in ICT trading.
Fair Value Gaps are powerful, but only when used correctly. Most traders see an imbalance and instantly mark it as an entry zone — but that leads to random, inconsistent trades. ICT’s method provides a much cleaner, safer, and more logical approach.
The idea is simple:
Displacement gives direction.
FVG gives the entry.
Retracement gives precision.
Once you understand this sequence, your entries become controlled instead of emotional.
The FVG you trade must form after strong displacement. This confirms:
A tiny gap created by small candles or slow drifting movements is not a tradable FVG. Only strong, forceful moves with solid candle bodies produce true, reliable imbalances.
A valid FVG is the empty space between:
with Candle 2’s body not overlapping this zone.
This three-candle structure proves that price moved so quickly the opposite side could not respond. That inefficiency becomes the zone institutions often revisit.
Mark only clean, obvious FVGs — not micro gaps formed inside noise.
This is where most traders fail. They enter too early.
Displacement is not the entry.
The FVG is not the entry.
The retracement into the FVG is the entry.
A healthy retracement usually appears:
If price crashes aggressively into the FVG, the imbalance may fail. A gentle drift back into the zone is ideal.
This ICT rule dramatically increases probability:
An FVG sitting in the wrong half of the dealing range is much weaker and often turns into an exhaustion gap.
Never enter blindly when price taps the imbalance. Wait for lower-timeframe confirmation such as:
These signals filter out weak FVGs that would otherwise fail.
ICT’s stop loss rules are clear and mechanical:
This keeps your stop outside the imbalance and away from market noise.
If the FVG and OB align, the OB’s high/low becomes the refined SL zone — allowing extremely tight stops with large risk-to-reward ratios.
Displacement always aims at liquidity. So your exits should target logical liquidity points:
Taking partials at liquidity creates consistent, rule-based results.
Because it mirrors real institutional behavior:
The retracement is the moment smart money mitigates orders and reloads positions.
Following this model gives you:
This is one of ICT’s most reliable and professional entry techniques — simple, structured, and incredibly effective.
FVGs appear everywhere on the chart, but they don’t all have the same meaning. An FVG inside a strong trend behaves completely differently from an FVG during a reversal or at the end of a trend. If you don’t understand this difference, you’ll buy into the wrong gaps, sell into the wrong gaps, and misread the entire narrative. This section shows exactly how to read FVGs in every market condition.
When the market is trending, FVGs act like “fuel stations” for continuation. They form because institutions push price aggressively, and they get filled because the trend needs to rebalance before continuing. A strong trend will show clear directional displacement, consistent FVG creation, controlled retracements into those FVGs, and continuation BOS after each fill.
The rhythm to watch for is:
Displacement → FVG → Retracement → Continuation
In an uptrend, bullish FVGs become discount entry zones. In a downtrend, bearish FVGs become premium entry zones. When you see multiple FVGs forming in the same direction, the trend is healthy and institutions are in control.
What to look for: a clean rejection from the FVG followed by a continuation BOS right after the fill. This is the safest and most reliable FVG environment.
FVGs also form during reversals, but their role is different. A reversal FVG typically appears after a liquidity sweep, a CHoCH, and a strong displacement in the opposite direction. This FVG does not represent continuation of the old trend — it represents the beginning of a new one. A reversal FVG is the first footprint of the new narrative and marks the moment institutions change direction.
These FVGs are extremely powerful because they:
If you can identify reversal FVGs, you catch trend cycles early instead of chasing late moves.
This is the most dangerous type of FVG. It forms at the end of a long trend, not the beginning. Exhaustion FVGs look aggressive and strong, but they usually form after extended moves, appear into HTF premium/discount extremes, fail to break major structure, get filled immediately, and reverse sharply afterwards.
These FVGs are retail traps. They are designed to trigger breakout buyers at tops, trap sellers at bottoms, and engineer liquidity before reversing. Clues you’re looking at an exhaustion FVG:
Never trade an FVG that forms at the extreme of a weak or tired trend.
Use this simple, accurate filter:
This 4-step process removes ~90% of FVG confusion instantly.
Most traders:
When you understand the difference between trend, reversal, and exhaustion FVGs, your accuracy increases dramatically — because you stop treating every imbalance the same. You begin recognizing which gaps are footprints of institutional intent and which gaps are traps.
Not all FVGs are created equal. Some are weak, some are reactionary, and some are simply noise inside consolidation. But a small category of FVGs consistently delivers high-probability trades — the ones formed through liquidity → displacement → imbalance. These setups carry the strongest institutional footprint and offer the cleanest entries with the least drawdown.
Below are the three highest-quality FVG setups in ICT/SMC trading.
This is the highest-probability FVG setup in the entire ICT model. It forms when price completes a liquidity hunt, shifts structure, and then prints a clean FVG as confirmation.
Because it contains all four elements of institutional intent:
No other combination is this clean or this reliable.
This setup marks the exact birth of a new trend and the beginning of a new dealing range.
Sweeps load the fuel. Displacement shows the direction. FVG gives the entry. Simple and lethal.
This is the premium continuation pattern inside a clean trend. It appears when institutions add to their positions after the initial trend has begun.
This setup aligns with:
When this pattern appears, the trend is healthy and institutions are reloading positions at optimal prices.
This repeating pattern is the “heartbeat” of every trending market.
This setup gives smooth continuation moves with extremely clean RR.
This is one of the most overlooked — yet extremely powerful — FVG setups. It forms inside a higher-timeframe dealing range, where HTF displacement creates an imbalance that price later returns to mitigate.
HTF FVG = HTF displacement
HTF displacement = major institutional intent
When price trades back into a higher-timeframe FVG, it often respects the zone with precision, shifts structure cleanly, creates LTF FVGs as confirmation, and then pushes toward the opposite side of the dealing range.
These three setups contain every key component of smart money logic:
They allow you to stop guessing and start trading with precision — understanding why price is moving, not just where. Every professional ICT trader focuses on these three setups. Every consistent SMC trader masters them. Every high-probability move originates from one of these engines.
Every trader loves marking FVGs. The uncomfortable truth is: most FVGs on your chart are useless. They look clean but lack institutional intent. They form in the wrong session, wrong context, or wrong location — and because of that they fail more often than they work. To trade FVGs profitably you must learn to filter them like professionals. The rule is simple: only trade FVGs created by real displacement, after real liquidity events, inside a coherent narrative.
The Asian session often produces thin-range price action, small algorithm-driven moves, and micro spikes. FVGs formed here usually come from weak pushes and are filled quickly. They rarely reflect institutional order flow and should not be treated as tradable footprints.
Best practice: use Asian price action to shape bias only. Wait for London/NY sessions for tradable FVGs.
News releases can create dramatic FVGs that look attractive but are unpredictable. News candles often expand then retract, ignore structure, and trap both sides. Treat them cautiously.
If a news FVG fills immediately, it was not institutional imbalance — ignore it.
Micro FVGs on 1–5 minute charts form constantly. Many are noise from algos or minor re-entries and do not affect higher-timeframe narrative.
Sideways markets produce accidental imbalances. In a chop zone candles alternate rapidly, no liquidity is grabbed, and structure stays intact. These FVGs are accidental artifacts of indecision, not institutional footprints.
Avoid trading chop-zone FVGs unless a HTF event legitimises the move.
A valid FVG must be created by displacement. Gaps generated by slow drift, overlapping candles, or wicks lack intent and usually fail.
Warning signs:
Rule: if the FVG was not created by true displacement → delete it. This filter alone removes the majority of low-quality setups.
Trading FVGs against the higher-timeframe (HTF) narrative is risky. A bullish FVG inside a bearish HTF trend is usually a corrective zone for sellers, not a buy signal for new longs.
Fix: accept only FVGs that align with HTF premium/discount, HTF BOS/CHoCH, HTF displacement, and HTF liquidity targets. HTF context is the primary filter.
Exhaustion FVGs appear after long trends. They look like final strong pushes but are often traps used to harvest breakout buyers and provide liquidity for reversals.
Treat late-trend FVGs with extreme caution — they commonly fail.
If most answers are “yes” → consider the FVG. If not → delete it and wait for a better, institutional-grade setup.
The FVG model works only when combined with liquidity, displacement, session timing, and structure. Fake FVGs violate these rules and fail. Removing weak FVGs makes price action cleaner and more predictable. You stop reacting to noise and start following institutional footprints. That transition — from marking every gap to trading only institutional-grade FVGs — turns random losses into a repeatable edge.
If you want FVGs to become second nature, you must train your eyes — not your memory. Most traders mark hundreds of gaps but never build skill. Skill comes from recognizing the right FVGs in the right context, repeatedly, in a short focused routine. Do this 10-minute drill for 7–10 days and you’ll begin to see FVGs the way ICT intends — with clarity, confidence, and narrative alignment.
Limit variables. Choose a single, clean instrument for the session, for example:
Stick to one pair for the whole drill.
Zoom out and mark three story elements:
Context first — without it, FVGs are just empty gaps.
Move slowly and mark every instance where price created:
On each FVG ask: “Did liquidity get taken before this gap formed?”
If YES → mark as high-quality. If NO → mark as weak.
For strong FVGs, check:
You’re training your brain to recognise institutional-grade FVGs, not retail noise.
Every high-quality FVG originates from one of:
Mark the origin precisely — this becomes your future entry zone.
Watch how price returns to the FVG. Ask:
This is the core entry teaching: Displacement → FVG → Retracement → Continuation.
Keep a tiny journal. One sentence per session internalises the pattern faster than long notes. Examples:
After a week of focused drills you’ll reliably recognise:
By day 7 you’ll begin to anticipate patterns. By day 10 FVGs stop being “gaps” and start becoming signals. This is how professionals learn — short, structured, repetitive exposure.
Most traders focus on candles, indicators, or random breakouts. They chase moves that “look strong” and avoid ones that “look weak.” They try to force entries inside consolidation or guess reversals. That’s why trading often feels confusing, emotional, and unpredictable.
When you understand Fair Value Gaps (FVGs), the chart stops looking chaotic and becomes readable and structured. An FVG is not just a gap — it is the footprint of institutional displacement. It marks moments where price moved too fast and decisively for the opposite side to respond. It is the signature of smart money: evidence of urgency and intent.
Understanding FVGs clarifies the entire SMC framework:
The FVG is the bridge between structure and intent: where liquidity is taken → where displacement begins → where imbalance forms → where the next entry waits. This cycle repeats across pairs, sessions, and timeframes.
Retail traders buy the breakout candle. Professionals wait for the retracement into the imbalance. The FVG tells you:
Trade the footprint, not the excitement of the candle. That makes your entries cleaner, stops tighter, and decisions calmer.
In ICT logic, price follows a repeatable engine:
Liquidity → Displacement → FVG → Retracement → Continuation
When you recognise this cycle, the market stops surprising you. You begin to anticipate moves rather than react to them. You avoid buying tops, selling bottoms, and falling for fake structure.
FVGs are the most reliable way to confirm:
Mastering FVG simplifies your process: you need fewer confluences and more clarity. The model becomes:
liquidity narrative → displacement → FVG → retracement → continuation
Now that you understand what FVGs are, why they form, how they confirm narrative, how to filter bad ones, and how to use them for entries — your next task is practice.
Use the 10-minute daily drill. Study displacement and FVG as a single concept. Mark only high-quality gaps and ignore weak ones. Focus on narrative, not noise. Within a week, FVGs will stop being “gaps” — they will become signals. When that happens, ICT trading becomes far simpler and clearer.
No. Many FVGs fill quickly, but high-quality FVGs in strong trends may take days or weeks to be mitigated. Weak FVGs formed without real displacement often fill immediately.
There is no fixed duration. Generally:
Higher-timeframe FVGs (4H, 1H, 15M) are more reliable because they represent larger institutional order flow. Lower-timeframe FVGs are great for entries but easier for price to violate.
Almost. Imbalance is the visible gap. Inefficiency is the
Yes. FVGs fail when they form without:
Fake or weak FVGs often appear inside consolidation or news volatility.
No. Only trade the first tap when:
If these are missing, skip the setup.
Bullish FVG: imbalance formed by aggressive upward displacement.
Bearish FVG: imbalance formed by aggressive downward displacement.
Both act as powerful retracement zones.
Place stops:
Your stop must sit beyond the origin of displacement, not inside the imbalance.
It’s risky. Asian session FVGs are typically weak because volume is low. The best FVGs form during London and New York sessions.
Neither is “better.” Each provides different information:
The strongest setups use OB + FVG together for confirmation and precision.


Why ICT Trading? Scope, Myths & Step-by-Step Smart Money Guide
January 24, 2026

Connect with focused ICT learners on our Telegram. Get daily insights, updates, and clear guidance to simplify your trading journey.
Join Channel